Introduction
To quickly find what you are looking for, it is useful to know how the navigation in Tribe CRM works. In this article, we explain Tribe’s main screen so you can get started quickly.
- What do you see in the blue bar of Tribe CRM?
- How do you work with the menu bar?
- Dashboards, widgets and views.
1 What do you see in the blue bar of Tribe CRM?
The blue bar in Tribe CRM is always visible and allows you to search and adjust various settings.
- Search: The search bar allows you to search by all relations and activities.
- Start hour registration: This button can be used to start timer hour recording.
- +: The + Button allows you to create a relationship or activity directly.
- Notifications: This is where all your notifications are displayed. The administrator of Tribe CRM can set up notifications using automations. For example, a notification that a colleague has set a task to your name.
- Marketplace: In the marketplace, you can activate financial links and links to E-mail and calendar such as Outlook calendar, Outlook e-mail, Gmail and Google Calendar.
- Personal Settings:
- Personal settings: Where you can, for example, upload a profile picture or set a different background picture.
- Invite Colleagues: Gives colleagues direct access to tribe CRM.
- Two factor authentication: Allows two factor authentication to be set. (This means that when logging in, another form of identification is required).
- Signing out.
- Account settings:
- Account settings: Here you can access the licence and account page (for Tribe CRM administrators only).
- Environment: Should you have access to multiple Tribe environments or a portal, here you have the option to switch between Tribe CRM and the other environment.
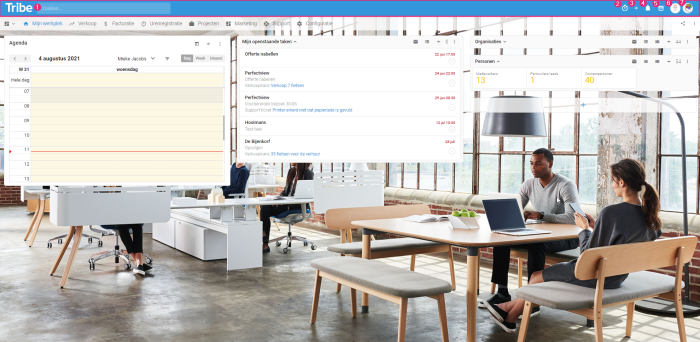
The blue bar in Tribe CRM
2 How do you work with the menu bar?
The menu bar allows you to navigate between My Workplace, the various modules and configuration.
- My dashboards: Here you can activate or deactivate dashboards by clicking on the asterisk. You can also create an entirely new dashboard here.
- My workspace: Your workspace is your personal desktop where you can see your appointments and tasks. You can optionally add widgets to make it even clearer for you.
- Modules: Depending on which dashboard you have activated, the dashboards for each module are displayed here and can be accessed from the menu bar.
- Configuration: In the configuration, you can find almost all the settings of Tribe CRM. Whether you have access to these depends on your permissions. On the Tribe Community, you can find articles to help you customise the configuration.
- Share dashboards: If you have a dashboard all set up to your liking and want to share it with your colleagues, you can! Click this button to share your dashboard.
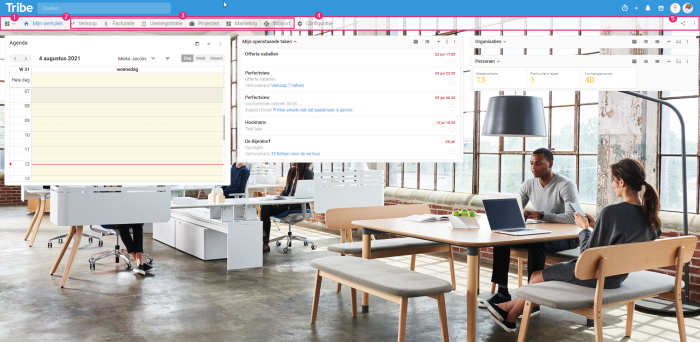
The menu bar in Tribe CRM
3 Dashboards, widgets and views
Dashboard
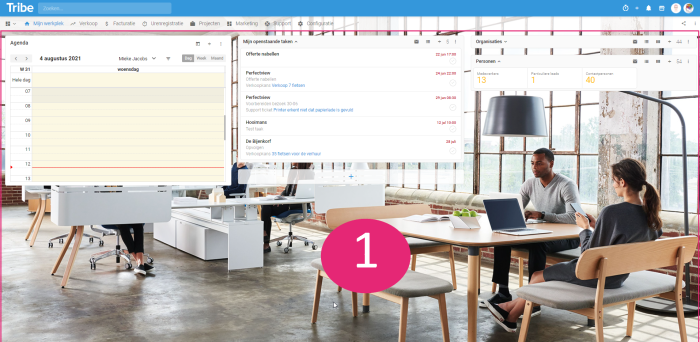
A dashboard (1) is an overview workspace in Tribe CRM that keeps you up-to-date on relationships or activities. There are several standard dashboards included in Tribe CRM, but you can also easily create them yourself. This article tells you all about it.
Widgets
All information on the dashboard is presented in widgets. The widgets help you keep track of the activities that are important to you. There is a widget library with many standard widgets, but you can also create and delete widgets yourself. The article What are widgets gives you more information.
Dashboards in Tribe CRM
Views
In the widgets, you can click through to a list view (1) or a column view (2). Then what the widget displays is shown in a list or column view. In these views, you can see all the information in an overview and also search and filter it.

Selecting a view in Tribe CRM