Introduction
The ticketing module enables you to keep track of all activities surrounding support tickets. At a glance, you can see the number of open tickets, which are being processed and which have been completed. You can see recurring problems per relation and all contact moments per support ticket. In this article, we explain how to work with the support activity and refer to useful related articles.
- How to create a support ticket?
- How do you use and adapt phasing?
- How can you see which tickets are still open?
- How can you track your support tickets?
- How do you complete a ticket?
- How do you activate the ticketing module?
1 How to create a support ticket?
A support ticket contains all information about an open issue with a customer. This could be a problem, a need for information or a desired adjustment. A support ticket is an Activity and it is associated with a relationship.
There are three methods to create a support ticket:
- By the customer via an e-mail. More information on this can be found in the article How does the ticketing module work?
- By the customer through the support portal. See the article How does the support portal work?
- Directly in Tribe.
Create a support ticket directly in Tribe:
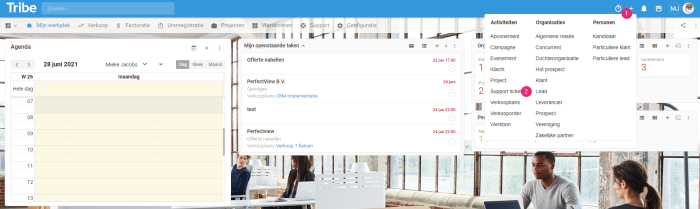
- Click on the + button in the blue bar
- Choose Support Ticket

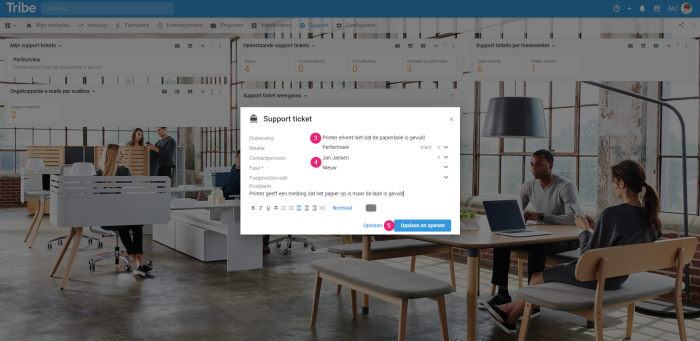
Add a support ticket in Tribe CRM - Enter the subject. The advice here is to enter as clear a subject as possible. This gives a diverse list from which a preselection can already be made if, for example, you want to assign tickets to an employee who focuses mainly on network problems
- Enter the remaining data
- Click Save and open if you want to continue working on the ticket or Save to save the ticket and continue with other work
- Enter further details

Add a support ticket step 2 in Tribe CRM
Did you know?
A support ticket is always created with an organisation’s contact person? This gives insight into who has opened which ticket and there can be direct communication with this contact person. You can create a support ticket directly in the contact person’s relation card. To do so, open the contact of the relation and click on + Support Ticket.
2 How do you use and adapt phasing?
The following phases are in the system by default:
| New: | You create the support ticket, but do not take it up yet |
| Under review: | You create the support ticket and resolve it immediately |
| Completed: | The issue has been settled immediately so the notification may be set to completed immediately |
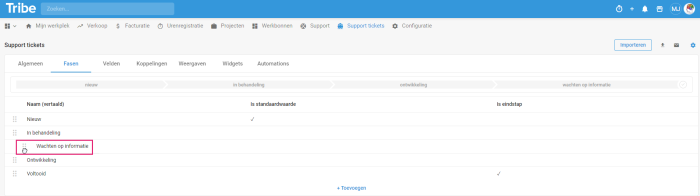
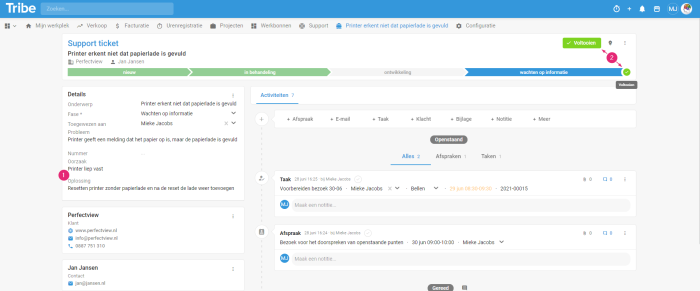
This is the standard setup within Tribe and these phases can be adapted to the procedures within your organisation. For example, you can choose to add Waiting for Information, Desire to Adjust or Development. The phases are displayed in the bar at the top of the ticket (1). The green Completed button (2) is clearly visible at the top right.
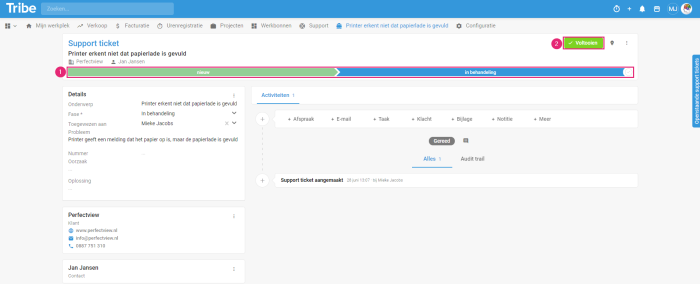
Displaying stages in a support ticket in Tribe CRM
Once the notification is set to Completed, this phase does appear in the bar above the ticket.

Displaying stages in a support ticket – completed in Tribe CRM
How do you customise the phases of a support ticket?
You adjust the phases of a support ticket in the configuration:
- Click
- Click on
- Click on the name Support Ticket.

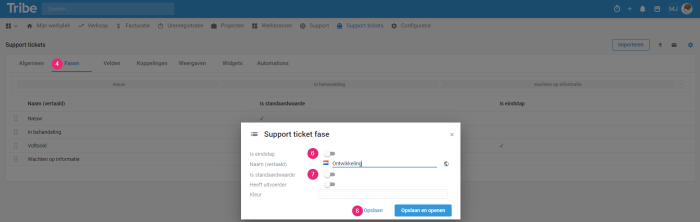
Configuring support phases in Tribe CRM - In the Phases tab, click on the existing titles to adjust the default phases
- Or click + Add to add new phases
- For each phase, indicate whether this is the Default value (6).
- And whether this is an End Stage. All tickets with a stage marked as Final Step (7) are not shown in the Open Tickets
- Click on Save

Configuring support phases in Tribe CRM

After adding the phases, adjust the order if necessary by clicking on the six dots and dragging the phase to a new place.
Changing order of support ticket stages in Tribe CRM
3 How can you see which tickets are still open?
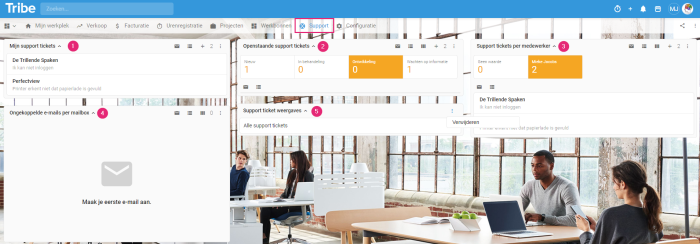
On the dashboard of the support page, you can find all support tickets. The following standard widgets are available:
- My support tickets: Display of all open support tickets registered in your name. Open a ticket directly by clicking on it.
- Open support tickets: display of number of support tickets per phase. Once you click on a phase, the support tickets in that phase are displayed below it
- Support tickets per employee: Displays the number of support tickets per employee. Once you click on an employee, that employee’s support tickets are displayed below it
- Unlinked emails per mailbox: This widget displays all emails that could not be directly linked to a relation or support ticket. The article How to work with the ticketing module provides more information on this.
- In addition, you have the option of creating a widget of the support views in which you can select which columns are of interest to you. The articles How do I create a list view? and What are widgets? provide more information on this.

The support dashboard in Tribe CRM
4 How can you track your support tickets?
Tribe allows you to enter, display and track all communication around a support ticket. Related notes, tasks and appointments are linked to the ticket and clearly displayed. In this section, we explain how you can track your support tickets.
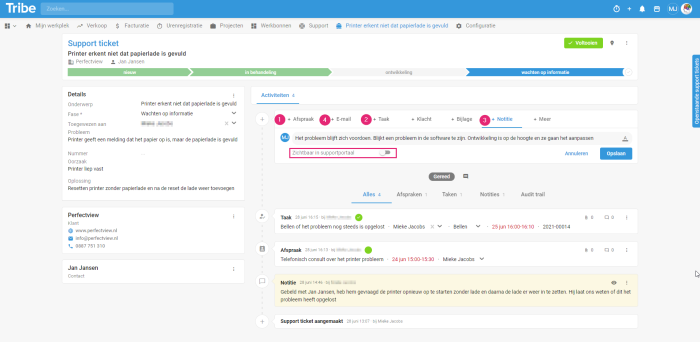
- Schedule an appointment: If it is desirable for the resolution of a ticket to make an appointment with a customer for e.g. a visit, a phone call or a remote session, schedule an appointment via the support ticket. This way, you always have all relevant information in the appointment and the appointment is visible in the support ticket and possibly your Outlook or Gmail To do so, open the support ticket and click on +Appointment
- Schedule a task: You can schedule tasks for yourself or a colleague in the support ticket. Tasks are displayed on the dashboard in My workplace so that they are not forgotten. To do this, click on +Task
- Add notes: Add a note to the support ticket at any time when you have contacted your customer. This creates a good view of the progress of a support ticket. These notes can be records of phone calls or appointments, or internal notes. Click +Note to add a note. Slide the Visible in support portal option (if you are using the support portal) to the right if the customer is allowed to see this note.
- Send an e-mail: From the support ticket, send an e-mail to the customer, this way your e-mail will be archived directly with the customer and you will have all communication around this support ticket in one place. Click +E-mail and set up the e-mail. Choose the correct template and add an attachment by clicking on the paperclip. Click Send once the email is ready.

Email, notes and attachments in a support ticket in Tribe CRM
All activities that are planned are displayed in under the heading Open. All activities that are completed are displayed under the heading Done.
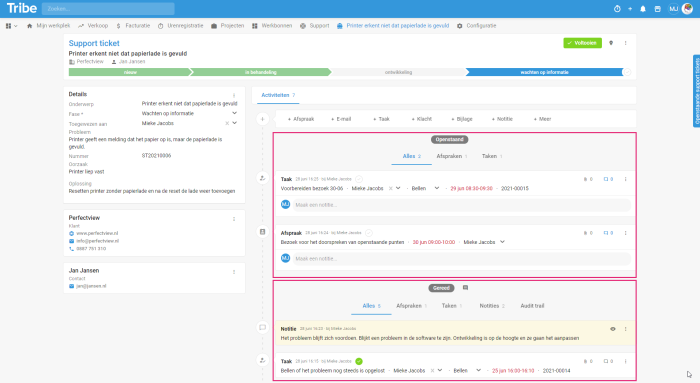
Activities open and activities archived in Tribe CRM
Did you know?
You get more explanation about what you see in the relationships and activities screen in the article What do I see on my screen (relationships and activities)? The article How do I create an activity gives more information on how to add tasks, appointments, attachments and notes.
Add notes customer portal
The support portal, allows your customers to log directly into his personal customer environment. This gives him insight into the current status of support tickets, attachments, e-mail communication and shared notes. He also has the option to add notes himself. The article How does the support portal work provides more information on this.
5 How do you complete a ticket?
Adjust the phase of a support ticket to complete once a support ticket is closed.
- It is recommended to fill in a cause and a solution before the ticket can be set to complete. Colleagues with a similar query can easily look back to see what the solution to this ticket was.
- Click the green Completed button in the opened ticket or the check mark behind the phase bar.

How to complete a ticket in Tribe CRM
6 How do you activate the ticketing module?
Administrators of Tribe CRM can easily activate the Ticketing module themselves. To do so, navigate to the account settings.
- Click on the organisation icon at the top right of the blue bar.
- Click Account settings.
- Click the add/remove modules button.
- Tick the Ticketing option and click on get started.