Introduction
By capturing all the elements of a project, you keep an overview of your projects. The project contains all the important information to keep track of your project and complete it successfully. Think about:
- Break the project down into milestones with overviews for each milestone.
- The recording of all contact moments and notes during the project.
- Understanding hours spent and remaining hours in a budget.
- Understanding the external costs incurred.
- Adding a project team with project members who can be either internal or external.
- Invoicing from the project.
- Handy dashboards and planners.
In this article, we will explain to you the day-to-day use of the projects module in a few steps.
- How do I create a project?
- The project screen
- How do I create milestones?
- How do I manage a project?
- How do I add hours to a project?
- How do I add external costs to a project?
- Invoicing from a project.
- Add work orders to a project.
- Completing a milestone or a project.
1 How do I create a project?
- Click on the + Button in the top right of the blue bar
- Click Enter the subject, relation and key data of the project. If the relation is not yet in CRM, you can create it directly. Click save and open to complete further details of the project. It is also possible to create a project directly from the relation. To do so, open the relation and click + Project in the toolbar.
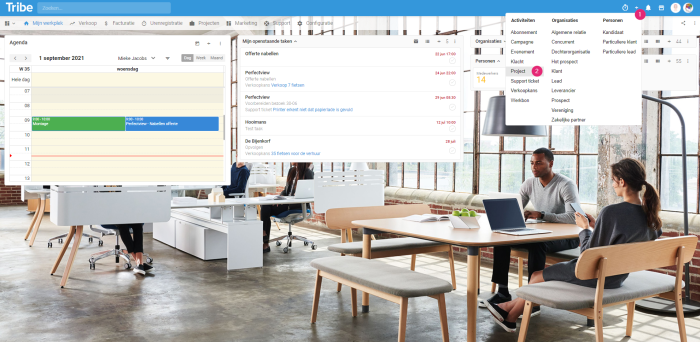
Creating a project in Tribe CRM
Did you know?
You can also start a project from a won sales opportunity? As soon as the sales opportunity gets the won status, the +Project button is available. Clicking this button will create the project and transfer all important data from the sales opportunity into the project.
2 The project screen
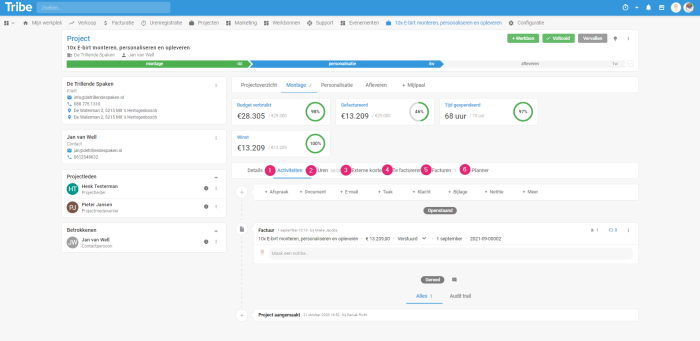
The project screen gives a complete overview of your project’s status, budget consumed, invoiced, time spent and profit.
- Subject: The subject of the project is displayed in the top bar of the project and can be adjusted under Details.
- Project overview: clicking on Project overview displays the dashboard of the entire project.
- Budget consumed: A Budget can be entered in the Details of the project, the Budget consumed dashboard shows how much of this budget has been consumed. When you click on the tile, further details are displayed:
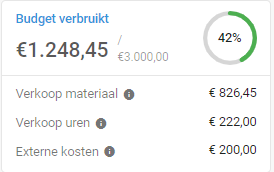
Details budget consumed in Tribe CRM
- Invoiced: The total of invoices already invoiced. Click on the tile for more details.
- Time spent: An Hours budget can be entered in the Project Details, in the Time spent dashboard you can see how much of this budget has been consumed. Click on the tile for more details.
- Profit: The total of To bill and Invoices minus External costs. Click on the tile for more details.
- Start date: Enter the date the project starts here.
- End date: Estimated end date of the project.
- Phase: pending, completed or expired: The current phase of the project. By default, these are the available phases. These can be modified in the configuration.
- Owner: Here you can select the employee who owns the project.
- Number: Each project is assigned a number for easy reference.
- Project members: Overview of employees involved in the project. Click the +Button to add project members.
- Stakeholders: Overview of external stakeholders in the project. Click the +Button to add a relation.
- Milestone: Milestones can be defined for each project. Each milestone has its own budgets, start and end phases. Each milestone has its own dashboard. Click on the milestone tab to see these overviews.
- Activities, Hours, External costs, To be invoiced, Invoices: Overview these elements of the entire project. When selecting a milestone, only the elements within the selected milestone are displayed.
- Planner: Overview of completed and planned activities of the project.
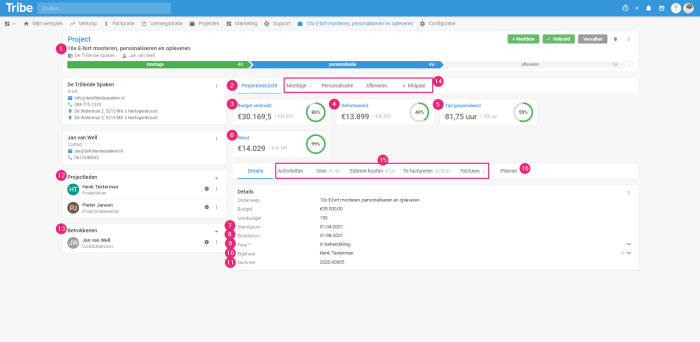
The project screen in Tribe CRM
Did you know?
In the article What do I see on my screen, you will find more general information about the structure of the activity form.
3 How do I create milestones?
A milestone is a phase within the project. A milestone has its own start and end dates and budgets. Each milestone has its own statements.
- Select the project and click +Milestone, enter the Details and click Save or Save and Open if you want to continue working on the milestone. In the Details screen of the milestone, you can enter a start and end date , an hours budget and a budget.
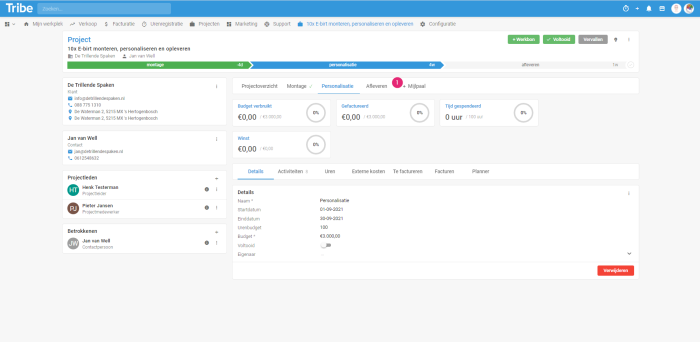
Creating a milestone in a project in Tribe CRM
4 How do I manage a project?
You book all activities, hours, external costs and invoices directly on a project to have and keep a complete overview. When using milestones, it is useful to select the relevant milestone first so that the relevant element is booked directly on this milestone:
- Activities: Select the milestone and click on the Activities tab. Under this tab, you can record all communications and agreements around your project such as notes, tasks and appointments. You can send emails and add documents.
- Hours: In the Hours tab (add hyperlink), you can book hours on the project. A distinction is made between Hours to be processed that have yet to be invoiced or processed and Hours Processed for hours that have already been invoiced or processed.
- External costs: This is where external costs can be booked, such as rental of materials. All costs booked here are deducted from
- Invoiced: All booked hours can be moved to To be invoiced pending the final invoice. Also, product lines that are yet to be invoiced can be added here.
- Invoices: Here you find an overview of all invoices by phase: draft, sent or reminder. When selecting the line, the details of the invoice are displayed. Any draft invoices can be sent from this screen.
- Planner: The planner gives you a daily, weekly or monthly overview of the completed and planned activities of the project in question. By clicking on the planner, you can directly add an appointment, task, work order or timesheet to the project.
Managing a project in Tribe CRM

The project planner in Tribe CRM
Did you know?
You can find more information on using tasks and appointments in the article: How do I track tasks and appointments?
5 How do I add hours to a project?
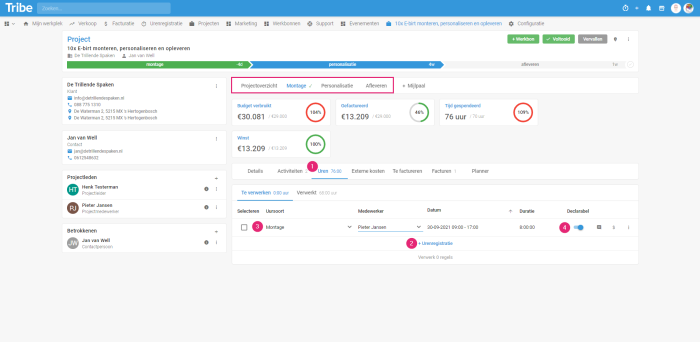
Hours can be registered the entire project or on a specific milestone. The hours entered are immediately displayed in the Time spent tile.
- Open the project and select a milestone if necessary. click on the Hours tab.
- Click on +Enrollment
- Select the Hour type, employee, date and duration.
- If the registered hours are billable, slide the slider to the right.
Adding hours to a project in Tribe CRM
Did you know?
There in the article How does the timesheet module work? The features of the time registration module are described in detail?
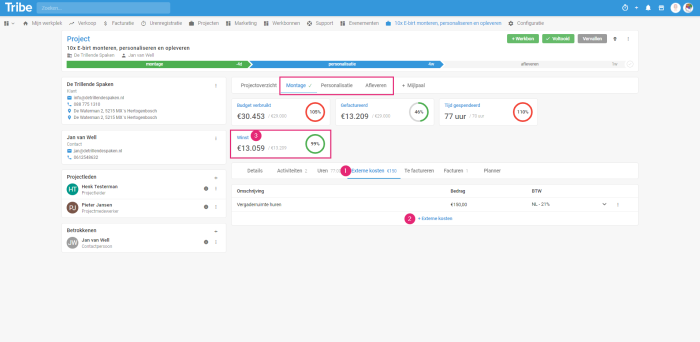
6 How do I add external costs to a project?
External costs may be incurred on behalf of a project. These can be linked to a project. The amount entered is deducted from profit (3).
- Open the project and select a milestone if necessary. click on the External Costs tab.
- Click on +External costs
- Enter a description, amount and the VAT code.
Add external costs to a project in Tribe CRM
7 Invoicing from a project
The hours booked can be invoiced directly from the project. In addition to hours, product lines can also be added to the invoice.
Adding product rules to a project
- Open the project and select a milestone if necessary. click the To bill
- Click +Product.
- Select a product and enter the quantity.
Invoicing from a project in Tribe CRM
Processing hours
After hours have been recorded, they still need to be processed. Even hours that are not declared must first be checked by the person responsible for the entity, e.g. the project manager. To process hours, open the Hours tab.
Here, the Running hours are displayed (in case a time registration has been started via the timer), Hours to be processed and Processed hours. For Hours to be processed, the following choices can be made:
- +Hour registration: Enter here the hours made can be entered afterwards
- Without invoicing: Process hours that are not billable. This moves them to the Processed tab
- To invoice: This is a temporary repository of hour records and product lines. Put here the hours that you want to invoice, but don’t want to put on the invoice yet. At a later stage, you can invoice the hours at once.
- To new invoice: Directly create a new invoice from the selected lines
- To existing concept invoice: Choose this option if there is already a concept invoice ready to which these hours should be added.
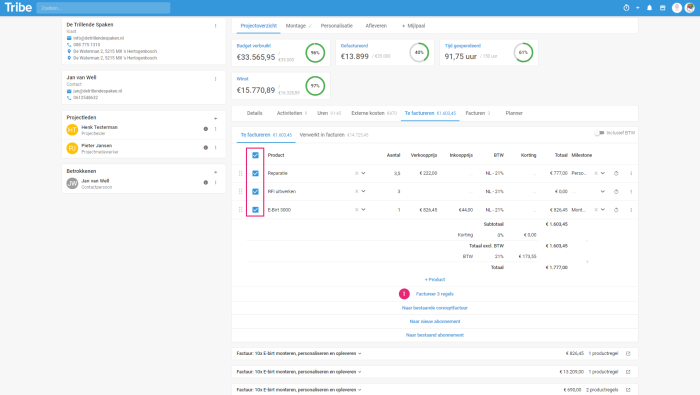
Invoicing product lines and hours
Once you get around to invoicing the hours and product lines incurred, open the project and the tab To invoice.
- Tick the lines you want to invoice and select Invoice x lines, enter the details and click Save and Open.

Product lines and hours invoices in a project in Tribe CRM
- A preview of the invoice will be displayed immediately. Click Send to send the invoice.

Sending an invoice from a project in Tribe CRM
Did you know?
In the article How do I create and send an invoice? the features of the invoicing module are described in detail?
8 Add work orders to a project
During a project, employees may go on site to deliver products and/or services. A work order is then desirable so that the customer can confirm that the product or service has indeed been delivered.
- A work order is easily created by clicking +Work order in the project main screen.
- Enter details and select a template.
- Click Save or Save and Open if you want to continue working on the work order.
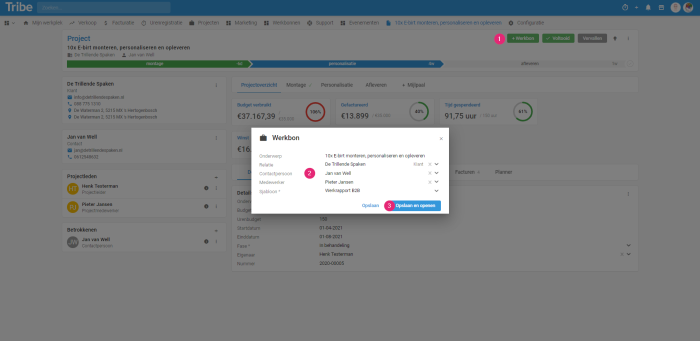
Adding a work order to a project in Tribe CRM
Did you know?
You can find more information about work orders in the article How can you work with the work order module?
9 Completing a milestone or project
As the project progresses, you can complete the milestones if they are completed. This properly reflects the progress in a project and every employee can immediately see which milestones have been completed and which are still ongoing.
Completing a milestone
Super! You have completed a milestone and now you would like to process it so that it is also clearly visible in a project. To do this, click on the milestone tab (1) and slide the Completed slider to the right (2) . The project’s milestone bar turns green and the next phase turns blue (3).
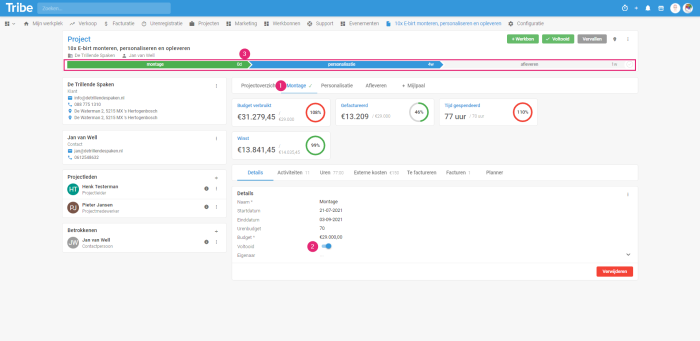
Completing a milestone in Tribe CRM
Completing a project
All milestones have been completed, all invoices have been sent and the project is done! Now you can also process this officially in Tribe CRM so that everyone knows the project has been completed. To do this, open the project and click Completed or the checkmark at the end of the milestone bar (1).
A project that has expired can be closed by clicking Expired (2).
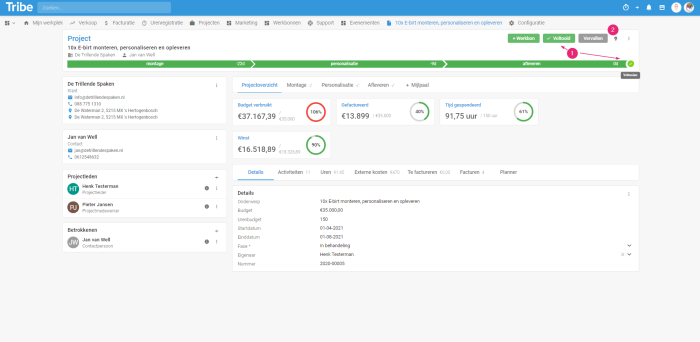
Completing a project in Tribe CRM