Introduction
Tribe CRM’s work order module makes it easy to create, send and approve work orders. You can do this on your PC, smartphone and laptop. So even when you are on the road. You easily add hours and products, report the work order ready and send it directly to the customer for approval. Invoicing is also done directly from the work order. In this article, you can read more about how to work with the work order module.
- How do I create work orders?
- The work order screen.
- How can I customise and create phases?
- How can I add hours to a work order?
- How can I process hours on a work order?
- How can I add products to a work order?
- How can I report a work order ready?
- How can I send a work order and get it approved?
- How can I invoice and close a work order?
1 How can I create work orders?
Work orders can be created from won sales opportunities, projects, directly on a relation or in the planning widget. For both won sales opportunities and projects, the +Work order button is available at the top right.
+Work order from the project

Creating a work order from a project in Tribe CRM
+Working voucher from the won sales opportunity

Creating a work order from a won sales opportunity in Tribe CRM
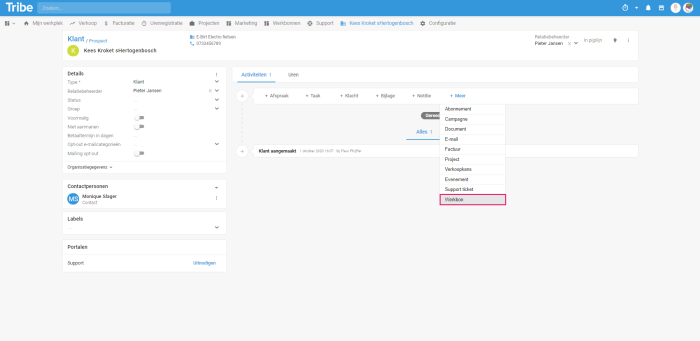
+Work order from a relation
Open a relation and click the +More button in the toolbar and select Work order.
Creating a work order from a relation in Tribe CRM
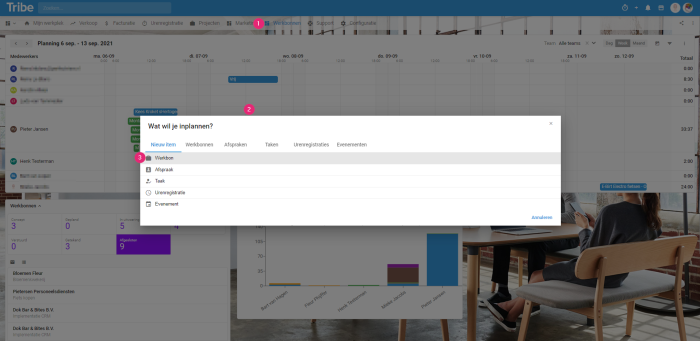
Creating a work order via the planning widget
- Open the Work Order Dashboard.
- Select a date and time.
- Select Work Order in the next screen.
Creating a work order via the scheduling widget in Tribe CRM
- Enter the subject of the work order.
- Select the template from the work order.
- Click Save or Save and Open if you want to continue working on the work order.
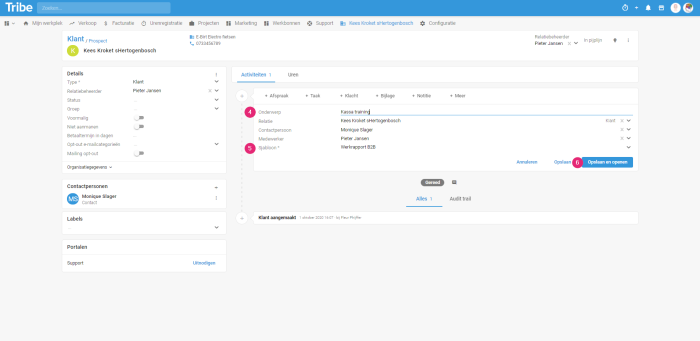
Creating a work order in Tribe CRM
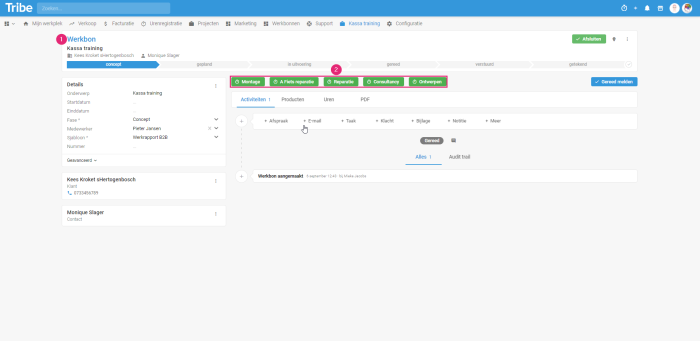
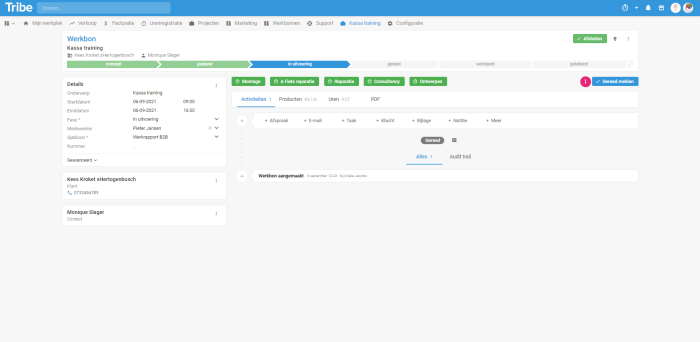
2 The work order screen
The work order screen gives a complete overview of your work order, booked hours and products, processed hours, invoices, open tasks and appointments, e-mails and other notes.
- Subject: Enter the subject of the work order here. This subject is displayed at the top of the work order and can also be searched for.
- Start date: The start date and time can be entered here.
- End date: Enter the end date and time. Once the start and end dates are entered, the phase of the work order changes from Draft to Scheduled.
- Phase: Draft, planned, in progress, ready, sent, signed and closed: The phase of the work order is displayed on the left of the Details screen, as well as at the top of the work order. The phases change automatically with the following actions:
- Enter date and time: Phase Scheduled.
- Entry of hours and products: Phase in Progress.
- Report ready: Phase Done.
- Send work order: Phase Sent.
- Digital signing of work order: Phase Signed.
- Closing the work order: Phase Closed.
- It is possible to customise the phases. This is explained in the next section.
- Employee: The employee creating the work order is filled in automatically. This can be modified.
- Template: The Template is the basis for the work order document. This is a mandatory field. Two templates are provided by default. These can be adapted to your own house style.
- Number: Enter your own number here or let Tribe CRM create the number automatically.
- Advanced: Under advanced, the PDF files are automatically displayed. In the top block the sent document and at the bottom the signed document. Should you have a printed work order signed, you can upload the scanned document here.
- Timers: Once the work order is created, timers by hour type are available here. Employees can start the timer when they arrive and stop the timer when they leave. The timers are then automatically added to the work order. Once the work order is reported Done, the timers disappear and Work Order Send for Info, Digital Signing and Invoicing are shown here.
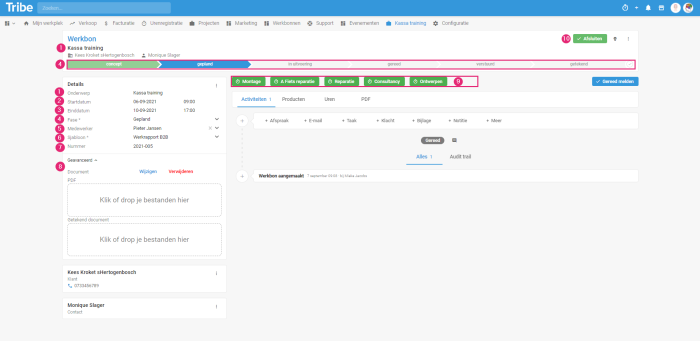
The work order screen in Tribe CRM
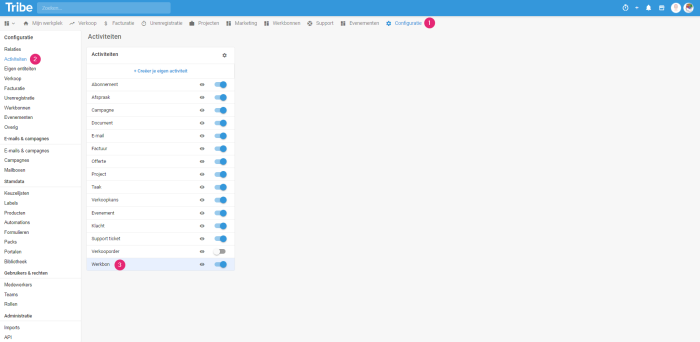
3 How can you customise and create phases?
By customising the phases, you can adapt Tribe to how the work order process works in your organisation. You can customise the phases in the activity configuration:
- Click
- Go to
- Click Work order.
Customising phases in Tribe CRM
- Click on the Phases tab. Click +Add if you want to add a phase. Click an existing phase to modify it. Slide Is default value to the right if you want every work order to have this phase.
- By clicking on the 6 dots, you can drag the phase to a different order.
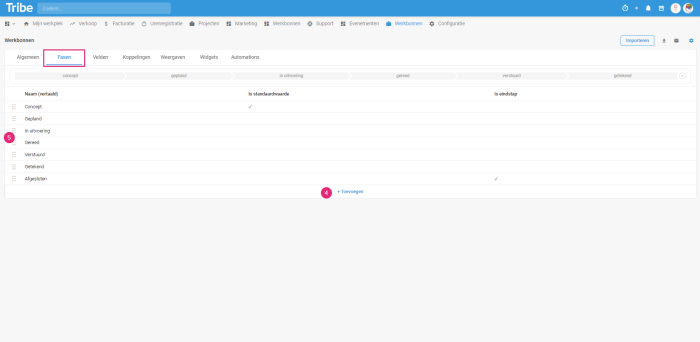
Customising phases in Tribe CRM
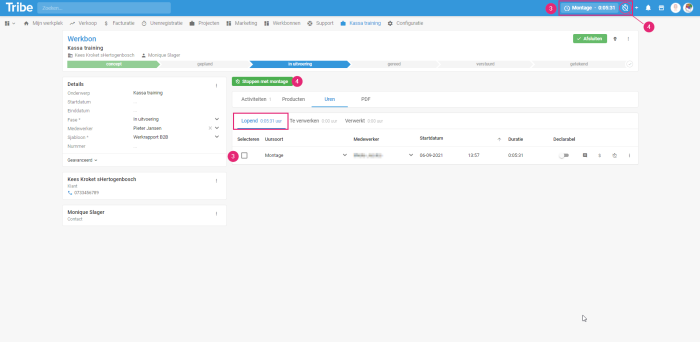
4 How can I add hours to a work order?
After the work order is created, hours can be added to the work order. This can be done manually afterwards or via the timer.
Adding hours to the work order via timer
- Open the work order.
- Click on the hour type of timer you want to start. The timer starts immediately.
Adding hours via timer in Tribe CRM
- As long as the timer is running, it is visible in the blue bar and under the Hours tab under Running.
- Click Stop Hour Type or the alarm clock with the line on it to stop the timer.
Stopping the timer in Tribe CRM
- With the timer stopped, the time entry is automatically saved under the work order under To be processed.
- If the hours are billable, slide Declarable to the right.
Saving a time registration via the timer in Tribe CRM
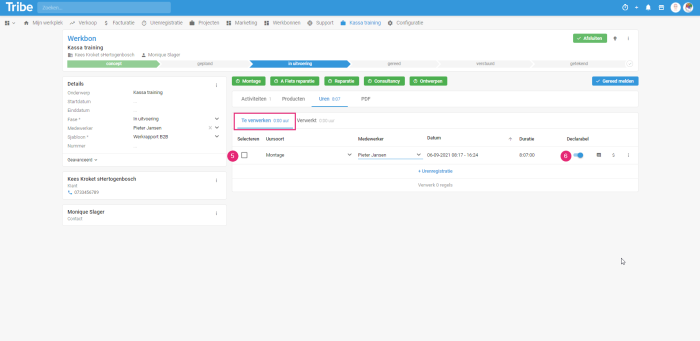
Adding hours to a work order afterwards
- Open the work order and click on the Hours tab.
- Click on +Hour registration.
Retrospectively add hours to a work order via Tribe CRM
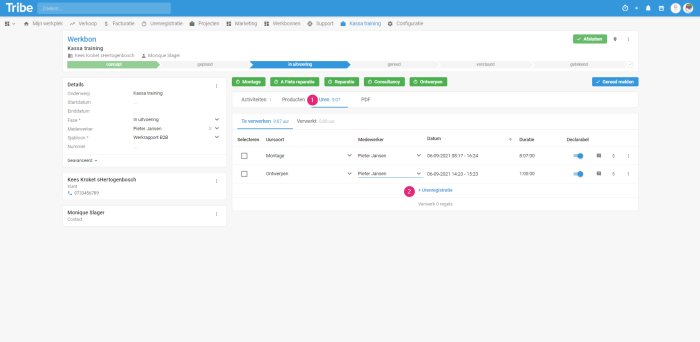
5 How can I process hours on a work order?
After the hours have been executed, they must be processed so that they can be shown on the work order. Processing means that the hours are final and can no longer be changed. You can choose to process Without invoicing or move the hours To invoice.
- Open the work order and click on the Hours
- Tick the hours you want to process and click Without invoicing or To invoice.
Processing hours on a work order in Tribe CRM
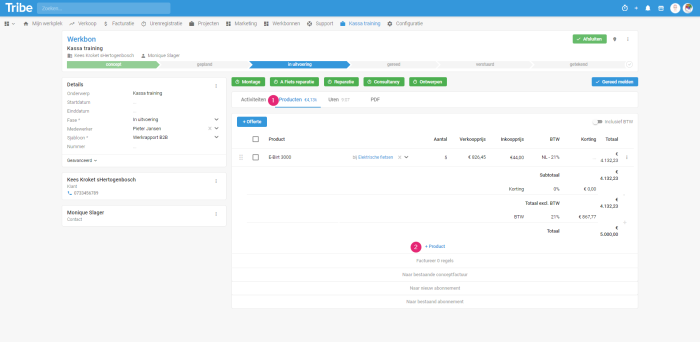
6 How can I add products to a work order?
If products are delivered during the visit, they can be added to the work order.
- To do so, open the work order and click on the Products
- Click +Product and enter the details.
- Process the products to a new or existing draft invoice if necessary.
Adding product lines to a work order in Tribe CRM
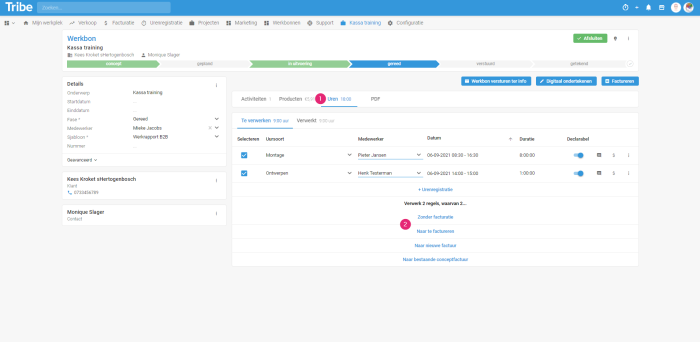
7 How can I report a work order ready?
Once the visit is finished, the work order can be set to ready. After the work order is set to ready, it can be processed further.
- Open the work order and click Report Ready.
Report a work order ready in Tribe CRM
Note!
Hours are not shown on the work order until they have been processed. So process the hours on the work order first before setting it to ready.
8 How can I send a work order and get it approved?
After the work order is set to ready, it can be processed further. It is also possible to send the work order to the customer for information only. In that case, select Send work order for info (1). The customer will then receive an e-mail with the work order as a PDF attached. It is also possible to have the work order digitally signed (2).
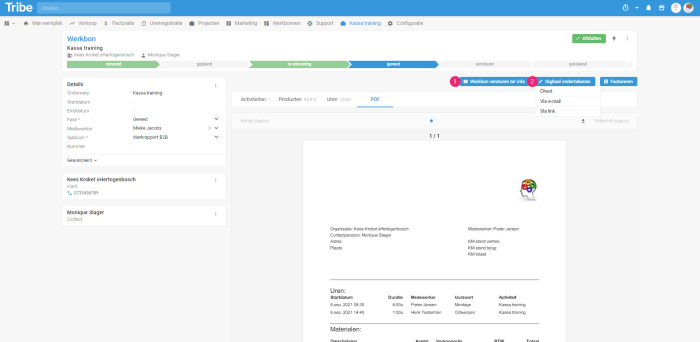
Sending a work order in Tribe CRM
If the work order needs to be approved by the customer, there are a number of options to get it approved:
Direct: The work order is displayed directly in a web browser and can be approved immediately. This is useful if the technician wants to have the work order signed digitally immediately (3) at the end of the visit.
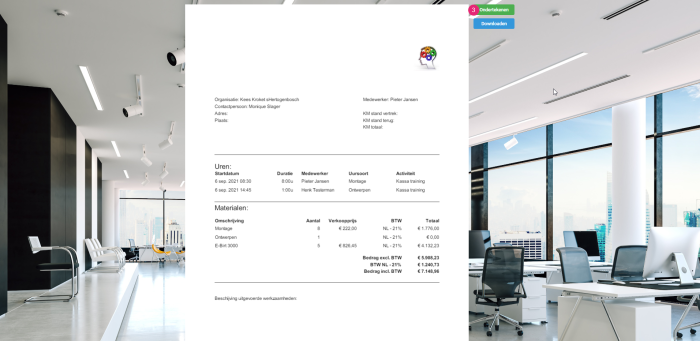
Approve a work order in the web browser in Tribe CRM

Approve a work order in the web browser in Tribe CRM
Via e-mail: The work order is sent as a PDF and there is also a link in the accompanying e-mail that allows the work order to be opened and signed in a web browser (as shown above).

A work order email in Tribe CRM
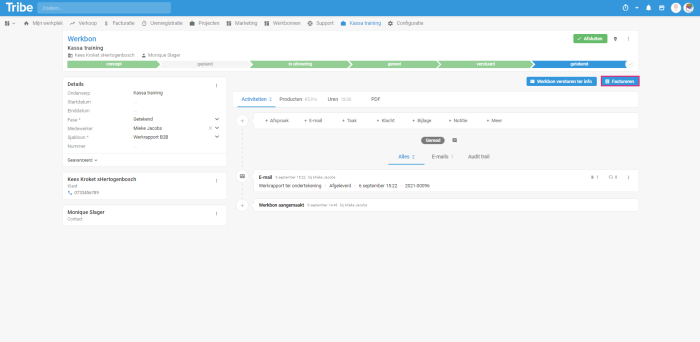
Via Link: If you choose this option, a URL is copied to the clipboard. This can be incorporated into an e-mail or other communication. This link also opens the work order in a web browser where it can be approved.
![]()
Work order phase changed to signed in Tribe CRM
9 How can I invoice and close a work order?
Invoicing a work order
After the work order has been signed, the work order can be invoiced. To do so, open the work order and click on Invoice.
Invoicing a work order in Tribe CRM
Enter the details and click Save and Open:
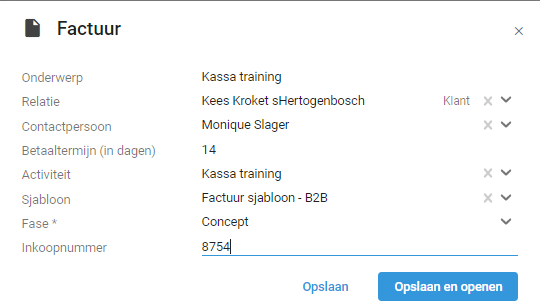
Invoicing a work order in Tribe CRM
The invoice is now displayed and can be sent immediately:
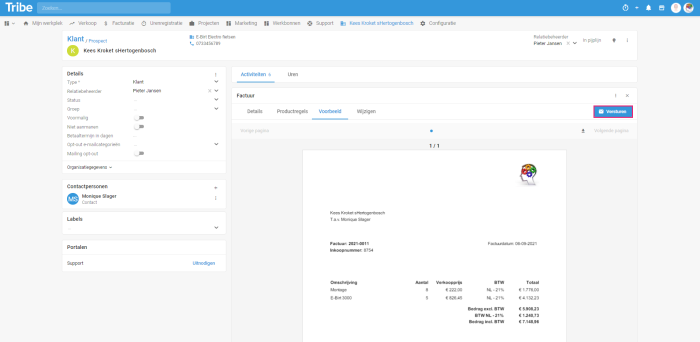
Sending a work order invoice in Tribe CRM
Did you know?
You can find more information on invoicing in the article How do I create and send an invoice?
Close a work order
Once a work order is complete, it can be closed. This ensures that it is clear to everyone that no more bookings can be made on this work order and that the work order is closed. Open the work order and click on Close.

Closing a work order in Tribe CRM