Introduction
A CRM is all about your relations. Properly managing your relations data and contact moments allows you to have good insight into all your relations in order to make the most of your opportunities. In this article, we explain how you can easily create relation.
- Relations: Persons, organisations and relationship types
- Creating an organisation and a contact
- Linking a contact to multiple organisations
- Creating a private individual (person)
- Managing relationships with multiple types
- Deactivating a relationship
- Retrieve all actions around a relationship: Audit trail
1 Relations: Persons, organisations and relationship types
Before we explain how to create a relationship, let’s give some background on the relationships between relations.
Relations are divided into Persons and Organisations in Tribe CRM. In addition, the different types of relationships are uniquely differentiated by means of relationship types. These types indicate what kind of relationship it is and, depending on the choice, certain registration fields are displayed in the relation card.
Organisations contain information about the organisation such as its name, Chamber of Commerce number, website and general e-mail address, among others. This information always remains the same regardless of the type associated with the organisation.
Persons contains information about a person. Among other things, you will find the names, private contact details, date of birth and gender. This information also always remains the same, regardless of the type.
A special distinction must be made for Contacts. These are Persons linked to Organisations with the Contact type. The information you process in the contact person fields does have to do with the organisation such as the business e-mail address, function and department. You can only create a contact through the organisation!
The type associated with an organisation or person determines what is visible in the detail field of this type. This is best explained with the example below of the organisation Perfectview (1) which is both a Customer and a Supplier:
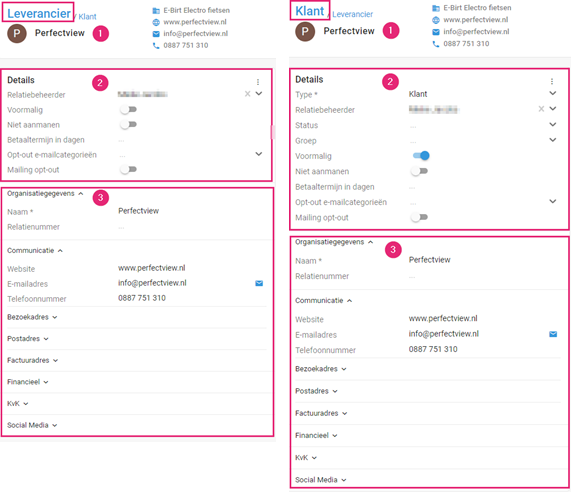
Organisations with different types in Tribe CRM
More fields are available in the Customer Details screen (2) than in the Supplier Details screen. The Organisation Details (3) are always the same. So the information in the Details screens may be different.
Did you know?
You can customise relationship types in Tribe CRM. The fields per relation type can also be set by the administrator of Tribe CRM within your organisation. This way, CRM can be customised to the preferences of your organisation.
2 Creating an organisation and a contact
Creating an organisation
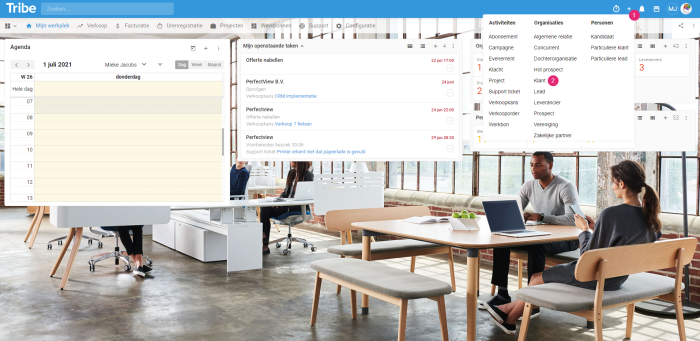
- Click on the + button in the blue bar
- Choose an organisation type

Add an organisation in Tribe CRM - Run the duplication check. This check provides the results that match your search criteria. This prevents duplicates from entering CRM and therefore cluttering up the system. You can consciously choose to continue or look up your existing relation.

- If you have entered a name, click on +Organisation: NAME
- On the next screen, you can fill in the basic details of the organisation and change the relationship manager if necessary. Click Save and Open. The organisation’s relation card is now opened and can be completed. By only clicking on Save, you can start working immediately based on the basic data entered.

Now enter the details of the organisation. This article explains the structure of the relations screen in more detail.
Did you know?
Tribe also has a chamber of commerce link? With that link, all available data from the trade register can easily be copied into Tribe. Tribe CRM also has a very handy Postcode link. If you click on the links, you can find more information about these links.
Creating a contact
Now that the organisation details have been added, contacts of the organisation can be added. Contacts in Tribe are Persons who are always linked to an organisation. By adding contacts, you always have all contact details together in one overview.
- Click the + Contact button in the organisation map

Add contact person in Tribe CRM - Enters the name of the contact (duplication check is performed again!)
- Click on +Person: Name
- On the next screen, you can enter the basic contact details. Click Save and Open. The contact’s relation card is now opened and can be completed.
If you want to go back to the organisation, click on the name of the organisation in the business card

Back to organisation in Tribe CRM
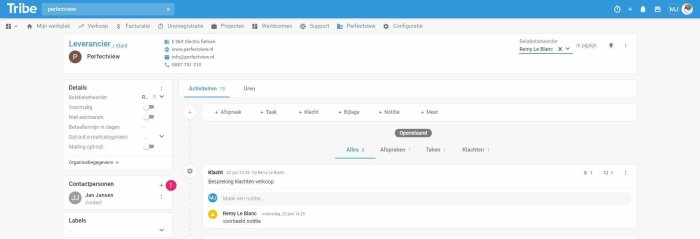
3 Linking a contact to multiple organisations
It is possible to link a contact to multiple organisations. This is useful when, for example, an accountant or secretary works for several organisations.
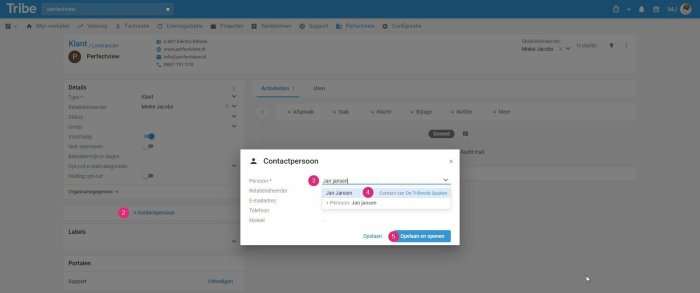
- Open the organisation to which you want to link the existing contact
- Click on + Contact
- Search on the name of the existing relation
- Select the existing relation (Contact of NAME is displayed)
- Click Save and open. The new relation card of this contact opens. Other details can be entered here.
Linking contact person to multiple organisations in Tribe CRM
The Contact’s business card (1) now shows both organisations. At 2, you can see which organisation is now open.

Contact for two organisations in Tribe CRM
4 Creating a private individual (person)
Via the + in Tribe’s blue bar:
- Click on the + button in the blue bar
- Choose a person type
- Run the duplication check just like organisation
- If you have entered a name, click on +Person: NAME
- On the next screen, you can fill in the person’s basic details and change the relationship manager if necessary. Click on Save and Open. The person’s relation card is now opened and can be completed.
Did you know?
You can also create an organisation or a person via the + button in the relevant widgets? Want to know more about the handy widgets? Click here!
5 Managing relationships with multiple types
A relationship may have multiple types and both types need to be added for data accuracy. For example, a supermarket may be a customer of yours but also a supplier.
To do this, we again create an organisation, but this time we choose an existing organisation. In our example, PerfectView is an organisation of type Customer, but we want it to also have the type Supplier.
- Click on the + button in the blue bar
- Choose the organisation type Customer
- Enter the name of the existing organisation
- Select the existing organisation
- Click on Save and Open
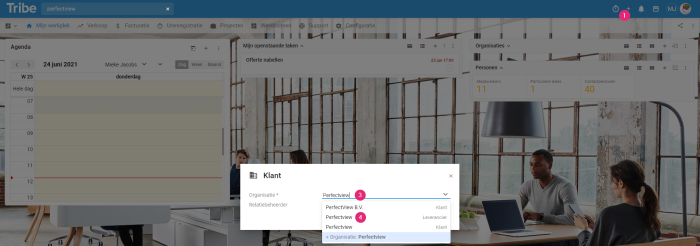
Organisation with two relationship types in Tribe CRM
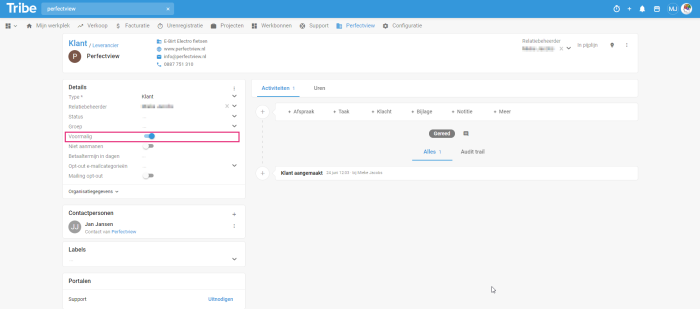
The type has now been added to the organisation. In the business card at the top, you can see which relation card is visible (1) and you can easily switch types by clicking on the other type (2).

Business card with two relationship types in Tribe CRM
6 Deactivating a relationship
Every relationship in Tribe has important information linked to it, such as activities, tasks and notes. For this reason, relationships are never deleted. However, a relationship may no longer be current because, for example, the organisation has gone bankrupt or a contact person is no longer employed by an organisation. Therefore, there is the option to deactivate the relationship while retaining linked information. To do this, turn on former. Once this option is activated, the relation can no longer be found in the active lists (though it can be found via the blue search bar!).
Deactivating a relationship in Tribe CRM
Did you know?
It is possible to delete a relation. A relation may have been entered incorrectly. However, this is often tied to user rights. Contact the Tribe CRM administrator within your organisation for this.
7 Retrieve all actions around a relationship: Audit trail
To give good insight into all actions done in a relationship, each relationship has an Audit trail: a log file showing all actions per user with date and time.
Opening the Audit trail:
- Click on the three dots at the top right of the business card
- Click on Audit trail
- Also, the Audit trail is visible in the Activities block under the Audit trail tab.
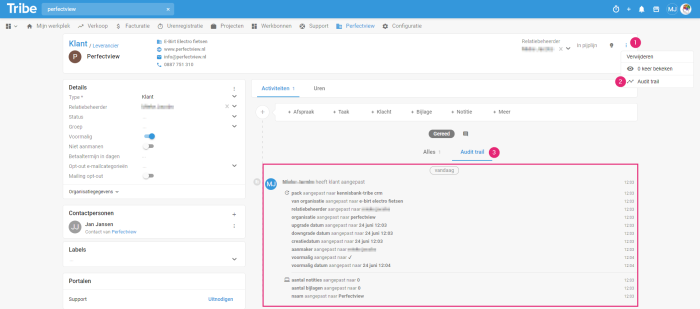
Audit Trail in Tribe CRM