Introduction
A portal is a website that you make available to your customers/relations. On this website, your customer can log in to view or modify their personal details. Think of being able to view invoices or report a support ticket. This data comes directly from Tribe CRM and is available in your customer’s personal protected environment. A portal offers both you as an entrepreneur and your customer huge benefits.
Tribe CRM offers you a number of standard portals, which you can start using right away. In this article, we give a further explanation of how to use the portals in Tribe CRM.
- What are the benefits of a portal?
- What standard portals does Tribe CRM offer?
- How do you invite a customer to a portal?
- What does a portal look like?
- How can you block access to a portal?
1 What are the benefits of a portal?
As an entrepreneur, you want to set yourself apart from your competitors. A portal or customer portal is enormously valuable for this purpose. A portal allows you to serve your customers even better. When you are no longer available outside office hours, your customer can log into his personal environment to view and change his data. 24/7, via a secure connection.
Moreover, he can also ask questions via the portal. This gives your customer a lot of control, resulting in higher customer satisfaction. In addition, a portal also simplifies your processes, as many phone calls or e-mails are no longer necessary because the portal allows the customer to arrange things himself.
Various documents can be viewed by the customer in the same place. Invoices, offers or e-mails can all be found in his personal portal.
2 What kind of standard portals does Tribe CRM offer?
Tribe CRM offers a number of standard portals for the various modules, which you can start using immediately. You only need to invite your relations to their personal environment. Which standard portals are visible in your Tribe environment depends on the modules that have been activated.
Currently, the following portals are available by default in Tribe CRM. Each portal contains its own functions. We explain these functions in separate articles. For more information on each portal, click through to the article.
- Support portal
- Invoicing portal
- Offer portal
3 How do you invite a customer?
If you have administrator rights, you can invite people to join a portal. This can be one portal, or several.
This is how you invite a contact:
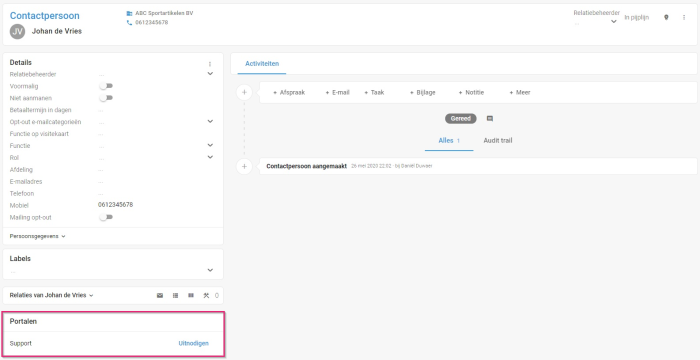
- Find the person and open their details.
- In the left-hand column, scroll down in details to the portals widget.
- The widget shows the available portals.
- Click the invite button.
- Then check the details, especially the e-mail address, and click
- The person automatically receives an invitation. By clicking on the link in the mail, he activates his account and is asked to create a password. He then has immediate access to his data.
Tribe CRM portal
4 What does a portal look like?
The exact details depend on the type of portal you invite someone to. Each portal consists of a header and below it a bar with one or more tabs, such as Support, Invoicing or Quotes. This way, a customer can easily navigate through the different data.
When you use the Tribe Creator edition, you have the option of customising the header to match your house style, by adding a logo and colour, for example. In addition, the creator edition also allows you to add your own pages to the standard portals or set up your own portal.
5 How can you block access to a portal?
It is also possible to block access to a portal. You do this by revoking access.
This is how you block access to a portal:
- Find the person and open their details.
- In the left-hand column, scroll down details to the portals widget.
- The widget shows the available portals.
- Click the Manage button next to the portal whose access you want to block.
- Then click the delete button.
- Repeat these steps for the other portals if necessary.