Are you creating templates and want to add fields to merge? Are you looking for the right data to add in a view or widget? Or do you want to create workflow automation or an API link to your website? To easily get started with all these functionalities, it helps to have some basic knowledge of the structure of Tribe CRM.
- Why do I need this basic knowledge?
- The theory, links in a database
- The practice, some examples in Tribe
- I get the basics, is there any advanced information?
1 Why do I need this basic knowledge?
Data, which you save in Tribe CRM, are stored in different places in the database. These different places are all connected to each other using links. You won’t see this in your daily use, but it may come up when you want to use data in a view or when adding a field to a template, for instance. Hence, we want to give you some extra background knowledge so that you understand how to easily use data captured at multiple levels.
2 How are data in a database linked together?
Before we dive straight into the system, let’s start with a bit of theory and an example. As mentioned, when capturing data in an application such as Tribe CRM, this data is stored in different places in the database. In this example, we will use a simple version of a CRM system.
This system naturally contains data from an organisation and data from a contact. This means that data is stored at two levels. As shown in the diagram below.
With a contact person, you obviously want to see which organisation he works for, and vice versa, you want to see which contacts work for an organisation. To make this clear, we draw a line between the organisation and contact person, a so-called link.
An organisation employs several contact persons. This is why we use an arrow instead of a line without an arrow. The arrow indicates that the link has been made in such a way that it is possible to register multiple contact persons. If we had drawn a line without an arrow, you would have been able to register only one contact person at an organisation.
3 Practice, some examples in Tribe
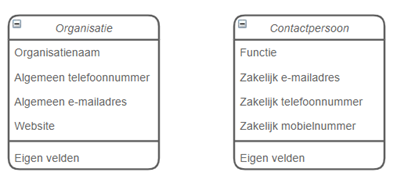
Organisation and contact
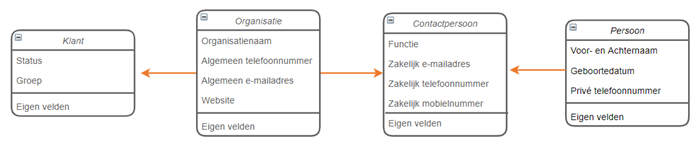
So much for the theory. Let us now look further at the structure of Tribe CRM. As mentioned above, the above example was a simple version of a CRM system. At Tribe, we have gone a step further in building the system to give you additional functionality. For example, we think it’s important that you can record the type of organisation or private details of the person. For example, you can see in the diagram below that we do not capture private data of a person at contact level, but at person level. For an organisation of the customer (or prospect, suspect, lead) type, we like to capture additional data specific to the customer type, such as status. This data is stored at the customer level and not with the organisation. The diagram below shows the relationship between customer and organisation, and person and contact.
Suppose you also want the status to be shown in a view of organisations, then your starting point is in the configuration Relationships > Organisations. In the field selection screen, the fields of organisation are shown directly. You find the status field by first navigating to the customer fields.
This is similarly true for personal details of contacts. If you want to create a contact person view incl. an extra column for the date of birth, your starting point is in the configuration relations > contacts. In the field selection screen, all contact person fields are shown directly. You won’t find the date of birth field in this view, of course; for that you navigate to the person fields.
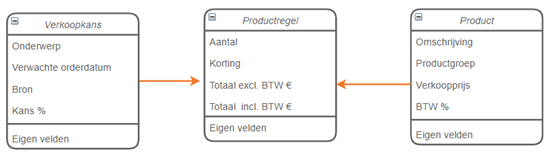
Sales opportunity and products
You now have a rough idea of the structure of the system. If we take a closer look at the Sales Opportunity activity, for example, we see that here, too, data is recorded at several levels. In a sales opportunity, you use product rules to record which product(s) you offer to a customer. A sale can therefore contain several product lines, hence the arrow in the drawing. Furthermore, the products that you select in the product lines of the opportunity are defined on a third level. In the product line, you always select one product. Because you can create several product lines with different products, we have drawn the arrow in the drawing from product to product line. So one product per line, but several products for several product lines.
Suppose you want to create a widget of the most sold products. Your starting point in the configuration is the sales opportunity, as this is where you record the sales. In the field selection screen, you immediately see all the fields that you can record on the sales opportunity. This does not include the product data. As described in the diagram, we first make a step to the product rules because these are linked to the sales probability.
In the sales event links, you can choose between single links and multiple links. As several product lines can be registered for one sales transaction, you will find the product lines in the multiple link (translated in the diagram by an arrow from sales transaction to product line).
The next step is product. From product lines, you want to go to product. Only one product can be added on one product line. You therefore see the product field directly in the field selection screen. Of course, you can also click through to the single links, as described in the next paragraph. Basically, this is the last step and you can select the product field.
If you create the widget slightly differently namely by product group, you have a third step you take. Namely, the product group is defined at product level. From the product rule, you again have the distinction between single and multiple links. In the single link, you find the product. If you select it, all product fields are displayed, including the product group.
4 I understand the basics, is there any information for advanced users?
With this basic knowledge, you can get started with the templates, views and widgets. Above all, try to think in the direction of the arrow, is it multiple or single? But the most important tip is to mainly start with this. By doing it more often, you will naturally notice that you learn to recognise the connections of the system.