CRM functions optimally by sharing as much data as possible within your organisation. However, sometimes it is necessary to shield data or restrict editing rights for a group of employees. By using roles within Tribe CRM, you can tailor the appropriate authorisation levels to your organisation’s needs.
- What rights does an administrator have?
- What permissions can I set within a role?
- How do I see what rights an employee has?
1. What rights does an administrator have?
First, you should know that within Tribe CRM, we have two types of users by default. The administrator and the ‘normal’ user. The administrator has access to all settings in the configuration and account settings. The user cannot access these functionalities, but has default rights to use all other functions within Tribe CRM. It is possible to give an employee administrator rights, just follow the steps below:
- Open the configuration.
- Navigate to the users & rights menu and click on the employees menu.
- Find the right employee and activate the administrator slider. The right is immediately available to this employee.
2. What permissions can I set within a role?
Before we dive straight into the roles, we’ll give you some background information on the structure of Tribe CRM. You will need this information when you start setting permissions at field level.
In Tribe, we use different relationship types and activity types. Each relationship or activity type has its own fields, the specific relationship/activity fields. There are also a number of fields that you see recurring in every relationship or activity. These are the generic data. These fields exist at a higher level, the parent relationship, and are shown in the daughter relationship. For example, the fields First name and Last name. You will see these fields in every person type. These fields exist at a higher level and are inherited to contacts or employees. The same applies to the Number field within an activity.
Now let’s see what this means in practice.
To set the right permissions, you first need a role. Follow the steps below to create the role:
- Open the configuration.
- Navigate to the users & rights menu and click on the roles menu.
- Click the +Role button and enter the name of the role.
- Click Save and open.
Type of rights
Basically, you can set the following permissions. This can be done at the entity itself, as well as at the field level. Click on the entity name to see the fields.
- Reading
- Create
- Change
- Remove
- Export
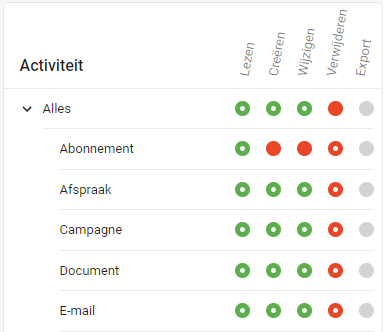
Authorisations within Tribe CRM
Clicking on a bullet adjusts the right.
- Granted: The right has been granted to the user. The right has been granted based on inheritance from the parent entity.
- Granted (explicitly set): The right has been granted to the user. The right has been granted on the specific entity or field in this role.
- Denied: The right has not been granted to the user. The right has been denied based on inheritance from the parent entity.
- Denied (explicitly set): The right has not been granted to the user. The right has been denied on the specific entity or field in this role.
- Not available: The right is not configurable. In the parent entity, the right is denied. The right is not adjustable in the subsidiary entity.

Authorisation legend Tribe CRM
Furthermore, the rights are divided into a number of different sections.
Relationship: This is the highest level. When you grant or take away rights at this level, this will be visible at the subsidiary entities linked to it. In the everything section, fields such as IBAN or relationship number are available. At organisation level, fields such as VAT or Chamber of Commerce number can be accessed. At person level, the first/surname or date of birth.
Relationship type: One level down, you will find the generic data for all relationship types, organisation or person. Think of fields like mailing opt-out or former.
Organisation types: Below that, you will find the specific data for each relationship type. These are the fields you have added on the map of a relationship type. The commercial relationship types contain a number of fields that are generic for all commercial relationship types, such as customer and prospect.
Person types: The above also applies to person types. Here, too, we know the common group commercial relations. In addition, we also know the contact group, which contains the generic fields that are available for both a contact and an employee. For example, function or e-mail address.
Activities: In the everything section, you will find all generic activity fields, such as subject or number. Furthermore, you will find all fields per activity type here.
Proprietary entities: This lists all the proprietary entities you have created in Tribe.
Pick lists: Here are all the drop-down lists in Tribe.
Templates: Here are all the templates in Tribe.
Configuration: This group contains the right to widgets and views. If a user has this right, it is possible for him to create widgets and views for the organisation, without administrator rights.
General: This group only contains the right to export. If this right is taken away, it will be implemented on all entities in this role.
Other: This group contains a number of entities that are commonly used and do not fall directly into any of the previously mentioned groups.
3. How do I see what rights an employee has?
A user can be in multiple roles, the rights within those stack up. If one role has a right on and the other does not, the role with the right on ‘wins’. Each individual employee can see which rights have been set for him on the basis of all roles that are linked to him.
Follow the steps below to view permissions per employee:
- Open the configuration.
- Navigate to the users & rights menu and click on the employees menu.
- Click on the key icon, the overview per employee is now displayed.
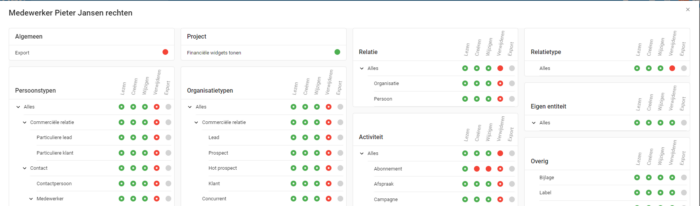
Authorisation per employee in Tribe CRM